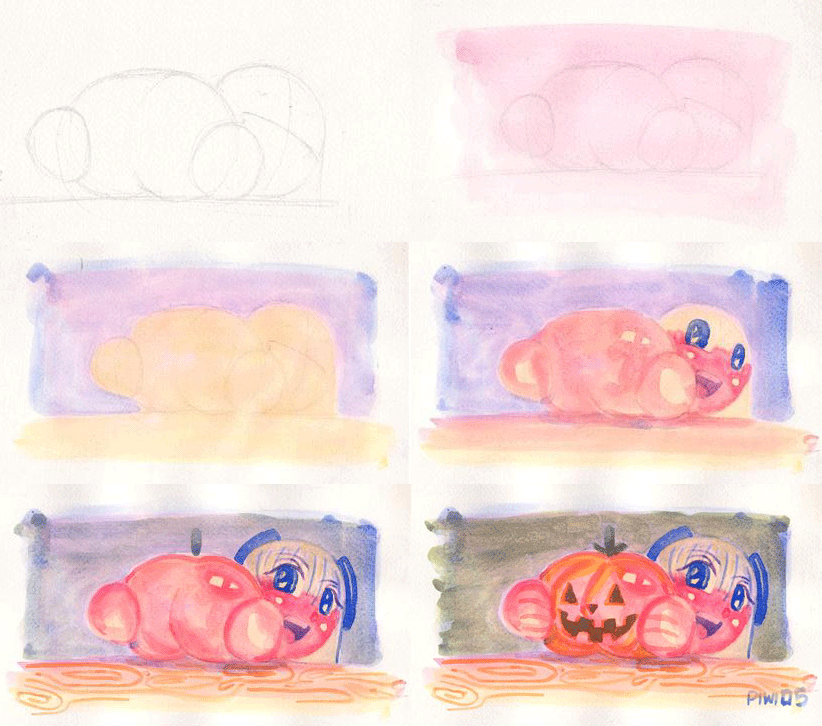
Basic Water Color- Animated GIF
Basic Water Color- Animated GIF
Basic Water Color- Animated GIF by Puffy_Tribulation

Description
Description
Yes it is an animated GIF file so wait for the next frames to show a few basic steps in watercolor.<br />
<br />
Painting with watercolors you see, is done by coating layer upon layer of paint. Every time you apply a new coat, you darken those areas, so avoid those parts you want to keep light.<br />
<br />
Step 1: Basic Sketch.<br />
A simple sketch is all you need, you don’t have to elaborate and keep it light as much as possible. Sketches simply serves as landmarks where you’ll apply the paint. Let your brush do the talking!<br />
For my basic sketches, I used simple circles to indicate the head, etc.<br />
<br />
Step2: Apply the under wash.<br />
This depends on what scene you are painting. i.e Blue or green for landscapes. I used carmine red for this example.<br />
Under wash gives you a good start by enhancing the next layers of colors.<br />
<br />
Step 3:<br />
Add yellow to the main subject and blue for the background.<br />
<br />
Step 4:<br />
Add red to bring out the skin of the subject, leave light areas to highlight the skin. Wait for it to dry. Apply blue for the eyes and to darken the mouth area. And another layer of blue to the background. <br />
<br />
Step5:<br />
Mix yellow and red to get the desired shade of orange. A diluted coat is applied to the subject, while a more concentrated one is applied to bring out the contour of the subject and details of the table. Mix blue and yellow for a green coat for the background. Let it dry. Blue for the ribbon and eyes again, and for the highlights of hair. Mix blue and red for the folds of the eyes and mouth.<br />
<br />
Step6: The final touches.<br />
Add yellow and orange to bring out the ridges of the pumpkin, orange outline her fingers. Let it dry. Apply orange to bring out the outline of the pumpkin eyes and mouth. Apply green to darken the eyes and mouth. Add green to the background.<br />
And there you have it, a drawing painted in basic watercolors.<br />
<br />
Try it.
<br />
Painting with watercolors you see, is done by coating layer upon layer of paint. Every time you apply a new coat, you darken those areas, so avoid those parts you want to keep light.<br />
<br />
Step 1: Basic Sketch.<br />
A simple sketch is all you need, you don’t have to elaborate and keep it light as much as possible. Sketches simply serves as landmarks where you’ll apply the paint. Let your brush do the talking!<br />
For my basic sketches, I used simple circles to indicate the head, etc.<br />
<br />
Step2: Apply the under wash.<br />
This depends on what scene you are painting. i.e Blue or green for landscapes. I used carmine red for this example.<br />
Under wash gives you a good start by enhancing the next layers of colors.<br />
<br />
Step 3:<br />
Add yellow to the main subject and blue for the background.<br />
<br />
Step 4:<br />
Add red to bring out the skin of the subject, leave light areas to highlight the skin. Wait for it to dry. Apply blue for the eyes and to darken the mouth area. And another layer of blue to the background. <br />
<br />
Step5:<br />
Mix yellow and red to get the desired shade of orange. A diluted coat is applied to the subject, while a more concentrated one is applied to bring out the contour of the subject and details of the table. Mix blue and yellow for a green coat for the background. Let it dry. Blue for the ribbon and eyes again, and for the highlights of hair. Mix blue and red for the folds of the eyes and mouth.<br />
<br />
Step6: The final touches.<br />
Add yellow and orange to bring out the ridges of the pumpkin, orange outline her fingers. Let it dry. Apply orange to bring out the outline of the pumpkin eyes and mouth. Apply green to darken the eyes and mouth. Add green to the background.<br />
And there you have it, a drawing painted in basic watercolors.<br />
<br />
Try it.
General Info
General Info
Ratings
Category Tutorials » Technique/Media Tutorials
Date Submitted
Views 2200
Favorites... 4
Vote Score 0
Category Tutorials » Technique/Media Tutorials
Date Submitted
Views 2200
Favorites... 4
Vote Score 0
Comments
5
Media Unspecified
Time Taken
Reference
Media Unspecified
Time Taken
Reference
Comments
You are not authorized to comment here. Your must be registered and logged in to comment
DarkSword on April 3, 2006, 12:30:19 PM
DarkSword on
Tane on March 11, 2006, 10:05:35 AM
Tane on
mmm4pizza on August 8, 2005, 1:32:34 AM
mmm4pizza on
AZNgummigurl on May 22, 2005, 11:35:03 PM
AZNgummigurl on
JHanna on May 22, 2005, 10:50:17 PM
JHanna on
