A little guide
A little guide
A little guide by emerald_fire2065

Description
Description
I thought I would give a quick little guide into how I create my artworks.<br />
<br />
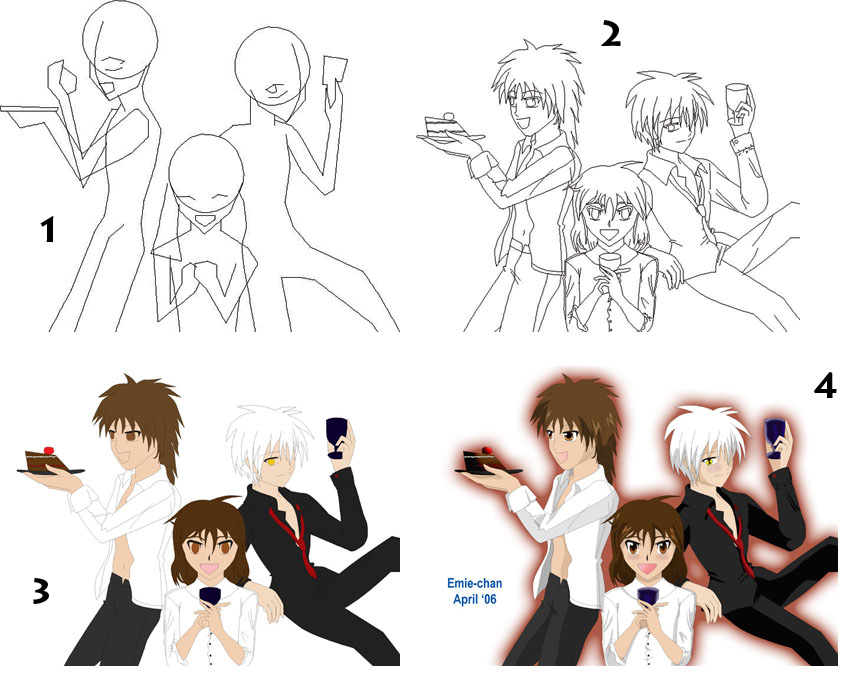
This picture shows the four main stages into how I create my pictures. In this example, I'm using my most recent picture 'Happy Birthday'.<br />
<br />
STAGE ONE<br />
<br />
Stage one is the preliminary stage, where I get the position of my characters. As you can see, it is incredibly crappy and totally disproportioned. But this is so I know roughly where my characters are going to go.<br />
<br />
STAGE TWO<br />
<br />
Now, I did cut off a little bit here, because I use two methods to create this outline. In Photoshop I use the Pen Tool to mark the size of the head, chest and hip, by creating an X and moving the middle to whichever direction the character is facing. This is a good tip because it can sometimes mark how wide the chest is.<br />
<br />
This is handy also because it means you know where the end of the diaphragm is, which is the end of the chest. It marks the main body positions.<br />
<br />
Unfortunately, this isn't shown here, since when I've done that I go onto adding the features such as hair and clothes over the body. This didn't work too well with Caramon here, but it was perfect for Raistlin and Palin. Oh, and I used a shoulder reference for Raistlin. I used a pic of Kyo from Fruits Basket to mark where the shoulders should be.<br />
<br />
STAGE THREE<br />
<br />
Now I have my outline, I set about removing all the unwanted bits (like little bits where the lines don't join or overlap and such). Then I add the flat colours.<br />
<br />
STAGE FOUR<br />
<br />
The last stage, where I used Hue/Saturation to add the shades, marking where I want to shade with the pen tool. I tend to decrease values by 15-30, and up somewhere between 15-30 for highlights. Then I add any background I need.<br />
<br />
And that's it. ^_^
<br />
This picture shows the four main stages into how I create my pictures. In this example, I'm using my most recent picture 'Happy Birthday'.<br />
<br />
STAGE ONE<br />
<br />
Stage one is the preliminary stage, where I get the position of my characters. As you can see, it is incredibly crappy and totally disproportioned. But this is so I know roughly where my characters are going to go.<br />
<br />
STAGE TWO<br />
<br />
Now, I did cut off a little bit here, because I use two methods to create this outline. In Photoshop I use the Pen Tool to mark the size of the head, chest and hip, by creating an X and moving the middle to whichever direction the character is facing. This is a good tip because it can sometimes mark how wide the chest is.<br />
<br />
This is handy also because it means you know where the end of the diaphragm is, which is the end of the chest. It marks the main body positions.<br />
<br />
Unfortunately, this isn't shown here, since when I've done that I go onto adding the features such as hair and clothes over the body. This didn't work too well with Caramon here, but it was perfect for Raistlin and Palin. Oh, and I used a shoulder reference for Raistlin. I used a pic of Kyo from Fruits Basket to mark where the shoulders should be.<br />
<br />
STAGE THREE<br />
<br />
Now I have my outline, I set about removing all the unwanted bits (like little bits where the lines don't join or overlap and such). Then I add the flat colours.<br />
<br />
STAGE FOUR<br />
<br />
The last stage, where I used Hue/Saturation to add the shades, marking where I want to shade with the pen tool. I tend to decrease values by 15-30, and up somewhere between 15-30 for highlights. Then I add any background I need.<br />
<br />
And that's it. ^_^
General Info
General Info
Ratings
Category Books » By Title » Dragonlance series
Date Submitted
Views 1412
Favorites... 0
Vote Score 0
Category Books » By Title » Dragonlance series
Date Submitted
Views 1412
Favorites... 0
Vote Score 0
Comments
0
Media Unspecified
Time Taken
Reference
Media Unspecified
Time Taken
Reference
Comments
You are not authorized to comment here. Your must be registered and logged in to comment
