Drawing Tutorial: Basic Feet
Drawing Tutorial: Basic Feet
Drawing Tutorial: Basic Feet by IsaChan_ArtStudio
Description
Description
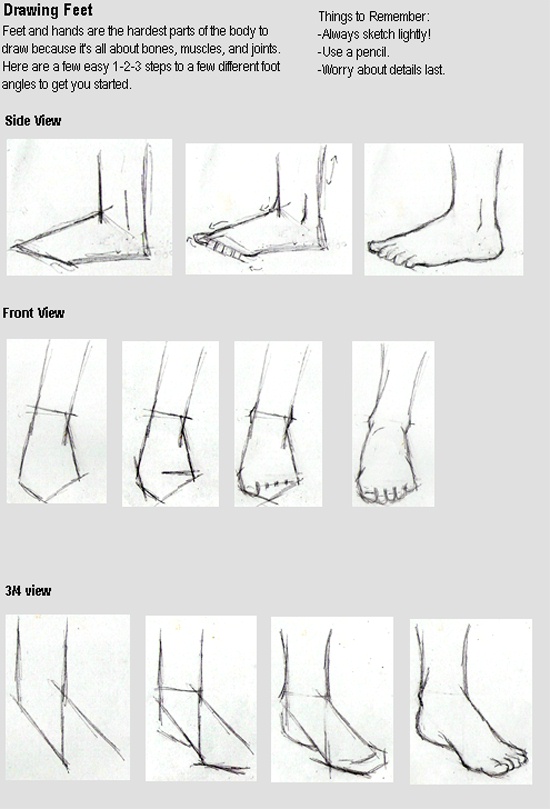
Step one: As with most aspects of the human body, feet can be broken down into the simplest form of lines and geometric shapes. Rectangles and triangles are the most prominent with feet (where as the body is trapezoids and ovals, hands are cylanders and squares, ect). So start out with a few basic lines to give yourself a general idea where to put them. <br />
Step two: For the side view, you add a few curves and an extra little jut-out for the heal. Add a few more lines for the toes, and using parallel lines as a guide for the joints. For the front view, add a few more lines to give the foot it’s shape. ¾ view is also adding more lines for shaping.<br />
Step 3: For the side view, this is the last step. Here, add a little curve to the bottom of the toes. Also add a SLIGHT curve to the bottom of the foot from toe to about 2/3 of the way to the heal. Add another slight curve from that point to the heal. Round the heal and ankle<br />
For Front and ¾ view, we start adding more detail. Still adding lines but also the outlines for the toes and ankle. Be careful with shaping the area around the toes. This is the hardest step for these views. <br />
Step 4: Round out your edges. All angles have a little curve. Make sure the toes still end where your guide lines are. Important curves are the arch of the heal for ¾ view and the curve of the foot in general for front view. Be sure to get these right or else it will look akward.<br />
So, there you go. Very basic, of course, but hopefully helpful.
General Info
General Info
Ratings
Category Tutorials » Human Tutorials
Date Submitted
Views 11525
Favorites... 24
Vote Score 0
Category Tutorials » Human Tutorials
Date Submitted
Views 11525
Favorites... 24
Vote Score 0
Comments
14
Media Unspecified
Time Taken
Reference
Media Unspecified
Time Taken
Reference
Comments
You are not authorized to comment here. Your must be registered and logged in to comment
Ban_Boredom on May 31, 2004, 10:21:56 AM
Ban_Boredom on
Trinity_Fire on May 31, 2004, 10:18:09 AM
Trinity_Fire on
 you definately should be an art teacher. @_@ AWSOME JOB THANKS YOUR TUTORIALS ARE AWSOME!!!!!! ^_^
Ban_Boredom on May 31, 2004, 10:07:38 AM
Ban_Boredom on
KenshinLover on May 31, 2004, 8:50:36 AM
KenshinLover on